
BAMBOO - the raw material. I bought this at Pier One and cut it into different lengths, trying to get as many flutes out of each piece.
 The different length and width of the flutes affect the tone and texture of the notes.
 We measure where to put the finger holes on the flute according to each participant's hands. This makes every flute unique and fitted to the owner, with a particular scale.
 In this workshop I heated zinc pokers to make the holes... hundreds of holes!
 This method requires a good deal of sanding and to clean out and around the hole after burning.
 Holey flutes!
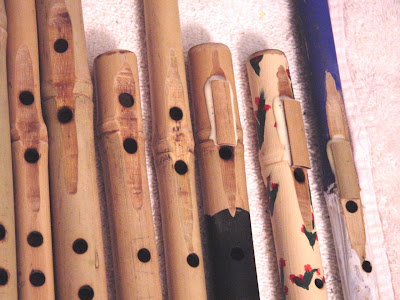
 One unique aspect of Native American flutes is the way the sound is produced. The "bird" (the small piece of bamboo) is attached and forms an "air bridge" between the two holes divided by the node.
 In my workshops with kids I glue the birds into place, which requires precision and care to make sure the bird is in just the right place and I see to it that the glue doesn't get anywhere to obscure the airflow.
 A number of different flutes with the birds recently glued.
 I ask the kids to draw in order to get some ideas on how they way to decorate their flutes. I like the far left example where the finger holes are peoples heads!
 We use acrylic paint.
 The flutes are "hung" to dry on sticks coming out of the wall. A friend of mine, Elizabeth from Sierra Leon, painted the encouraging message which I promply posted.
 Decorated, drying flutes.
 Some participants also decorate their flutes with beads stuck in beeswax, following the method traditionally used by the Huichol Nation of Mexico.
 Happy flute makers!
 A content flute maker.

 The different length and width of the flutes affect the tone and texture of the notes.
 We measure where to put the finger holes on the flute according to each participant's hands. This makes every flute unique and fitted to the owner, with a particular scale.
 In this workshop I heated zinc pokers to make the holes... hundreds of holes!
 This method requires a good deal of sanding and to clean out and around the hole after burning.
 Holey flutes!
 One unique aspect of Native American flutes is the way the sound is produced. The "bird" (the small piece of bamboo) is attached and forms an "air bridge" between the two holes divided by the node.
 In my workshops with kids I glue the birds into place, which requires precision and care to make sure the bird is in just the right place and I see to it that the glue doesn't get anywhere to obscure the airflow.
 A number of different flutes with the birds recently glued.
 I ask the kids to draw in order to get some ideas on how they way to decorate their flutes. I like the far left example where the finger holes are peoples heads!
 We use acrylic paint.
 The flutes are "hung" to dry on sticks coming out of the wall. A friend of mine, Elizabeth from Sierra Leon, painted the encouraging message which I promply posted.
 Decorated, drying flutes.
 Some participants also decorate their flutes with beads stuck in beeswax, following the method traditionally used by the Huichol Nation of Mexico.
 Happy flute makers!
 A content flute maker.
I helped kids make over 100 flutes that summer!


No comments:
Post a Comment
Note: Only a member of this blog may post a comment.